Theme Configuration
-
1. Enabling the theme
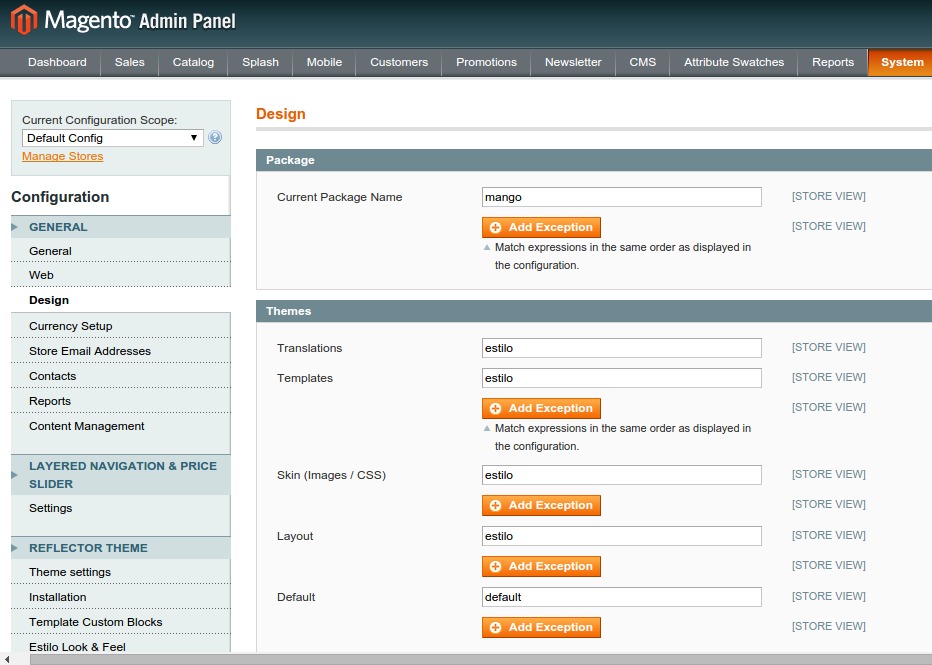
- Go to the Administration page: System > Configuration > Design
- Select an option from the "Current Configuration Scope:" dropdown list, on the top-left corner of the configuration page. If this is your only theme, you can leave the value "Default Config" selected.
Depending on your theme ( estilo or reflector ) , enter the following values :
Estilo Theme
- Current Package Name : mango
- Translations : estilo
- Templates : estilo
- Skin (Images / CSS) : estilo
- Layout : estilo
- Default : default
Reflector Theme
- Current Package Name : mango
- Translations : reflector
- Templates : reflector
- Skin (Images / CSS) : reflector
- Layout : reflector
- Default : default
Example
Do not use the System > Design section in the Magento admin panel to enable the theme.
- Save the values. Your site will not have the colors and fonts applied yet. You still have one more step to follow.
-
2. Theme Colors and Fonts
- Go to System > Configuration > Mango Theme > Reflector (or Estilo) Look & Feel
- You will see the template information, you can enter your own style variables,
- or you can choose from the available default settings available, go to the box "Load from available styles" and choose one of the styles, the page will reload with the values in each field.
- Once you are done with editing the values, save the configuration.
- After this, a css file will be generated and you can visit the frontend of your Magento store and see the new look.
-
3. Demo pages and blocks
Our themes provides a demo installation feature.
- In order to install the demo pages and blocks, navigate to System > Configuration > MangoTheme > Installation
Select all or some of the 3 options and then click on the "Import Data" button.
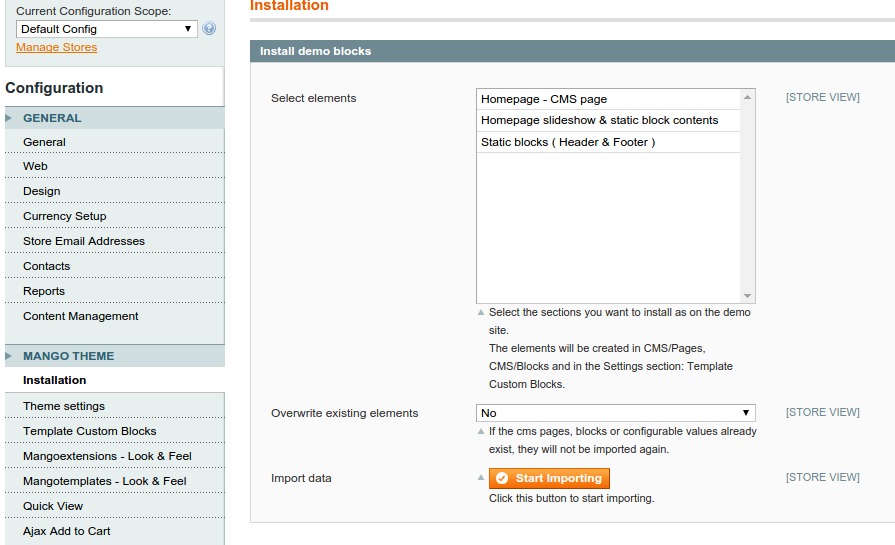
- Go to the cms section to see the newly added blocks and pages.
-
4. Catalog Settings
After the skin files have been generated, you need to configure your catalog appearance, on the Mango Theme section ( System > Configuration > Mango Theme ), you will see other available tabs:- Theme Settings
- Template Custom Blocks
- Quick View
- Ajax Add to Cart
go through all the options and read the comments in each field to understand what they are for, we made them as self explanatory as possible.
Header
Header Settings
- Search block
Display search box in header
- Search block
Category Navigation
Settings for the category navigation
- Display menu
Display categories navigation block.
- Title
Button title for responsive version. E.g.: Browse Categories, Site Navigation
- Links before
Enter comma separated Label-Link pairs in different rows, for example:
- Home,/
- Contact,contacts
- About us,about-us.html
- Links after
Enter comma separated Label-Link pairs in different rows, for example:
- Home,/
- Contact,contacts
- About us,about-us.html
- Multicolumn navigation
Enable multicolumn navigation
- Add custom blocks
Create custom blocks with block code : category_nav_CATEGORYID_before or category_nav_CATEGORYID_after , e.g.: category_nav_150_before for category with id 150, to place the block before the subcategories list
- Display menu
Breadcrumbs
- Show on categories
- Show on product pages
- Hide breadcrumbs based on path
Enter paths in different rows, for instance:
catalog/category/view/id/10
catalog/product/view/id/425
Catalog pages
Settings for the products lists and grids
- Show top toolbar
- Show bottom toolbar
- Columns in grid( Large Screen > 1200px)
- Columns in grid ( Desktop )
- Columns in grid (Tablets )
- Columns in grid ( Small devices )
- Show "Add to Cart" button in grid
- Show "Add to Cart" button in list
- Product images proportion
Enter the image proportion in x:y format ( x and y integer numbers ) , the sizes will be calculated automatically. Common values are 1:1 , 3:4, 4:3 , 9:16, 10:16
- Product images width
The product images will be loaded from the server using this width, and then resized in the template. A common value is : page-width / number-of-columns-in-grid , e.g.: 1200/4 = 300
- Lazy load images
Lazy Load is delays loading of images in long products lists. Images outside of viewport are not loaded until user scrolls to them.
Product pages
Settings for the products details page
- Columns proportion
The product details page shows 2 columns: images on the left and the product description on the right. The available space uses a grid of 12 columns, you can enter how many columns each section will use, for instance, 6:6 ( equal width) , 8:4 ( wider image ) or 5:7 ( the right column will be wider).
- Product images proportion
Enter the image proportion for in x:y format ( x and y integer numbers ) , the sizes will be calculated automatically. Common values are 1:1 , 3:4, 4:3 , 9:16, 10:16. This will be applied to the main image and the thumbnails.
- Main product image width
The product images will be loaded from the server using this width, and then resized in the template. A common value is : page-width / 2 , e.g.: 1200/2 = 600
- Thumbnails width
The product images will be loaded from the server using this width, and then resized in the template. A common value is : page-width / ( 2 * thumbs-per-row , e.g.: 1200/ (2*4) = 150
- Large images width (zoom and lightbox)
The product images will be loaded from the server using this width, and then resized in the template. A common value is : 1000 or page-width
- Enable cloudzoom
Enable zoom when hovering on images.
- Thumbnails per row
Number of thumbnails per row to display below the main product image. Accepted values are : 3,4,5,6
- Columns proportion
Sidebar blocks
Settings for the sidebar blocks
- Product images proportion
Enter the image proportion for in x:y format ( x and y integer numbers ) , the sizes will be calculated automatically. Common values are 1:1 , 3:4, 4:3 , 9:16, 10:16. This will be applied to the main image and the thumbnails.
- Product images proportion
Wishlist
To remove the wishlist completely, go to Customers > Wishlist > General Options, and set the option "Enabled" to No.
- Enabled in products list/grid
Show add to compare link in categories and search results pages
- Enabled in products details page
- Enabled in products list/grid
Add To Compare
- Enable sidebar blocks
- Enabled in products list/grid
Show add to compare link in categories and search results pages
- Enabled in products details page
Footer Configuration
- Footers rows and columns
Enter number of columns used by each block in each footer row (Each row has 12 available columns) .
For example:- 3,3,3,3 (Equal width columns)
- 2,2,2,3,3 ( The first 3 columns are narrower than the last 2 )
- 3,3,6 ( two narrow blocks and one wide block )
- Footers rows and columns
Custom CSS
Include your own css file with the theme
- Use custom css
Create the file skin/frontend/mango/MYTHEME/css/style-local.css so it can be included.
- Use custom css
-
5. Featured Products Widgets
Our themes come with 8 configurable featured products widgets that allow you to showcase featured products anywhere on the site. You can insert featured products in the categories menu, the contents area, the sidebars ( left or right ) or in the footer.
Content Area
- Featured products carousel: display selected products by in a carousel slider
- Featured products grid: display selected products by id as a products grid
- Featured category products carousel: displays products from selected category in a carousel slider
- Featured category products grid: displays products from selected category as a products grid
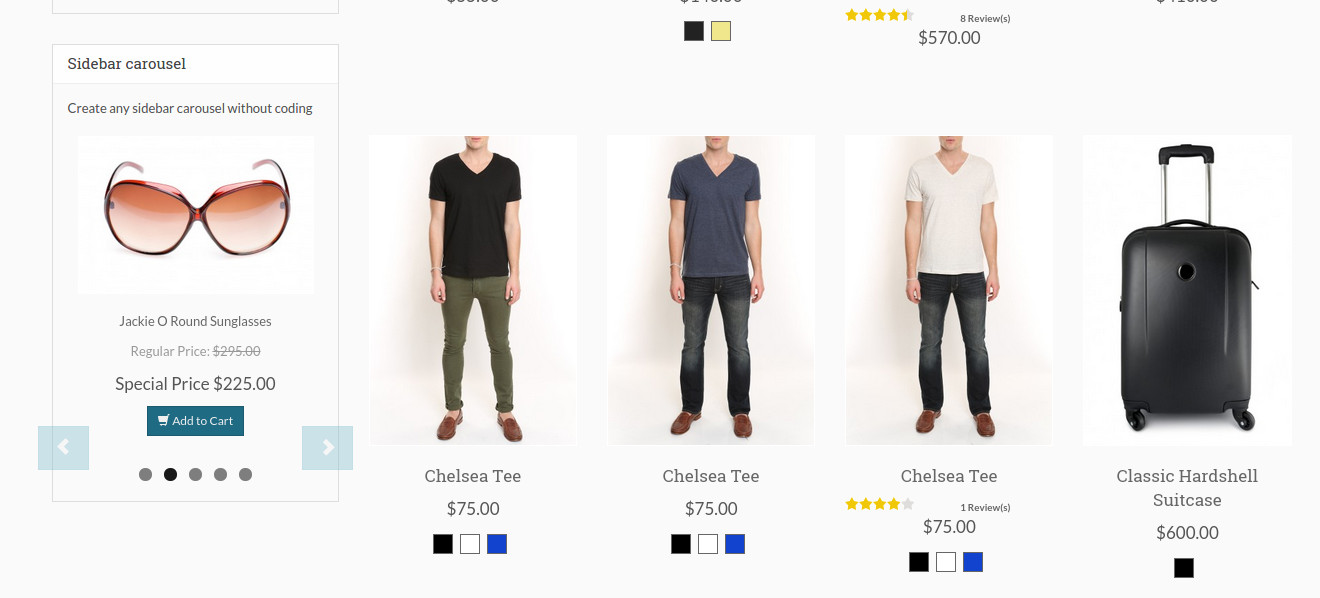
Sidebar Area
- Featured products carousel: displays selected products by id in a carousel slider
- Featured products list: selected products by id as a sidebar products list
- Featured category products carousel: products from selected category in a carousel slider
- Featured category products list: products from selected category as a sidebar products list
Inserting widgets
- Go to CMS > Widgets
- Click on "Add New Widget Instance"
- Select one of the available widgets ( Starting with 'Featured Products' or 'Featured Category' ) and select the package: mango/reflector or mango/estilo
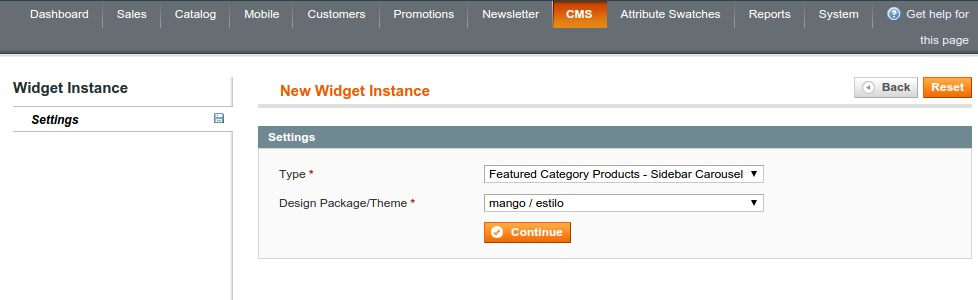
- Choose the store view on the "Frontend Properties" section and and the widget position on the "Layout Updates" section.
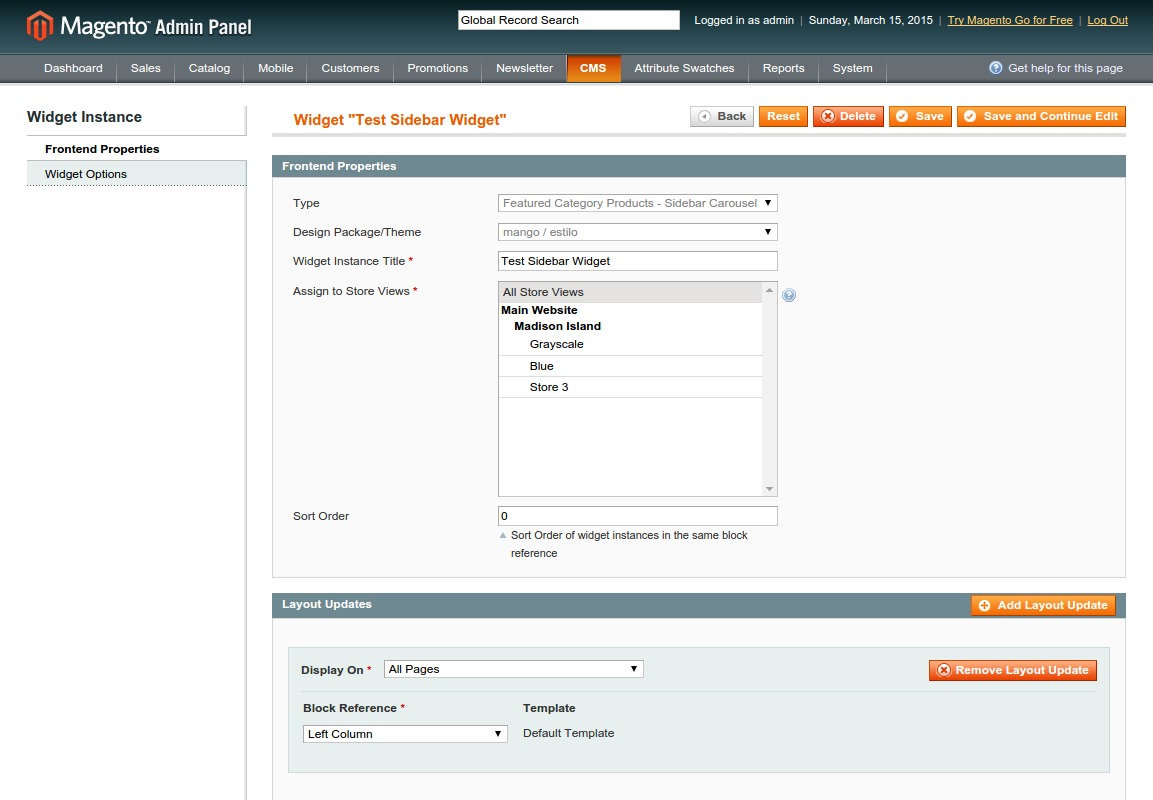
- Select the widget options:
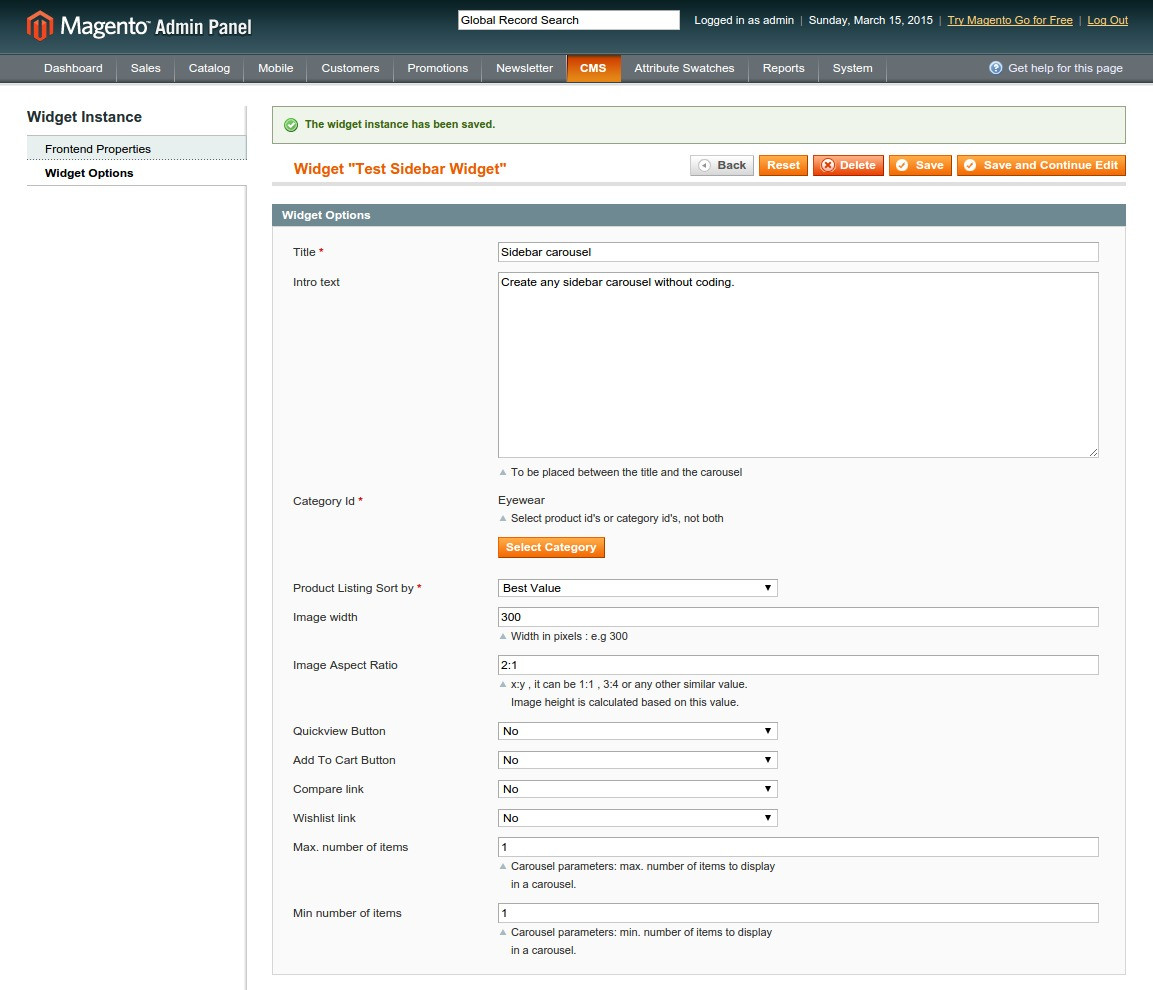
- Save the widget and visit the Magento frontend, you need to clear the Magento cache or to disable it in order to see the changes.
-
6. Custom Blocks in Main Content Area
To create product carousels or products lists on the homepage or any page in your store, as on the demo site, you need to use the "Insert widget" button or add the shortcode:
CAROUSEL CODE:
{{block type="theme/widget_featured" name="carousel_name_here" title="Another List of Featured Products" css_id="carousel_css_id_1" cart="1" quickview="0" min_items="2" compare="1" wishlist="1" product_ids="240,241,242,258,259,260,406,410,456,285,286,287,294,295,296,325,326,327,328,329,418,421,425,873,325,326,327,328,329,426,427,428" image_width="250" image_proportions="2:3" max_items="4" template="featuredproducts/carousel.phtml"}}PRODUCTS LIST CODE:
{{block type="theme/widget_featured" name="homepage_list_2" title="Jewelry" intro="You can create as many lists as this one and place them anywhere" quickview="1" css_id="homepage_list_1" category_id="19" wishlist="1" cart="1" compare="1" col_lg="6" col_md="4" col_sm="3" col_xs="2" template="featuredproducts/list.phtml" image_width="300" image_proportions="2:3" }}The following parameters are available:
- name
- title
- intro
- css_id
- template : featuredproducts/carousel.phtml or featuredproducts/list.phtml
- category_id
- product_ids : you can use comma separated id's or a category id , not both at the same time.
- image_width
- image_proportions x:y , it can be 1:1 , 3:4 or any other similar value
To show buttons:
- wishlist : 1 or 0
- quickview : 1 or 0
- compare : 1 or 0
- cart : 1 or 0
Carousel parameters:
- max_items : items to display in a carousel page.
Products list parameters:
- col_lg : number of grid columns to display on large screens - Desktop.
- col_md : number of grid columns to display on medium screens - Laptop.
- col_sm : number of grid columns to display on small screens - Tablet.
- col_xs : number of grid columns to display on x-small screens - Smartphone.
-
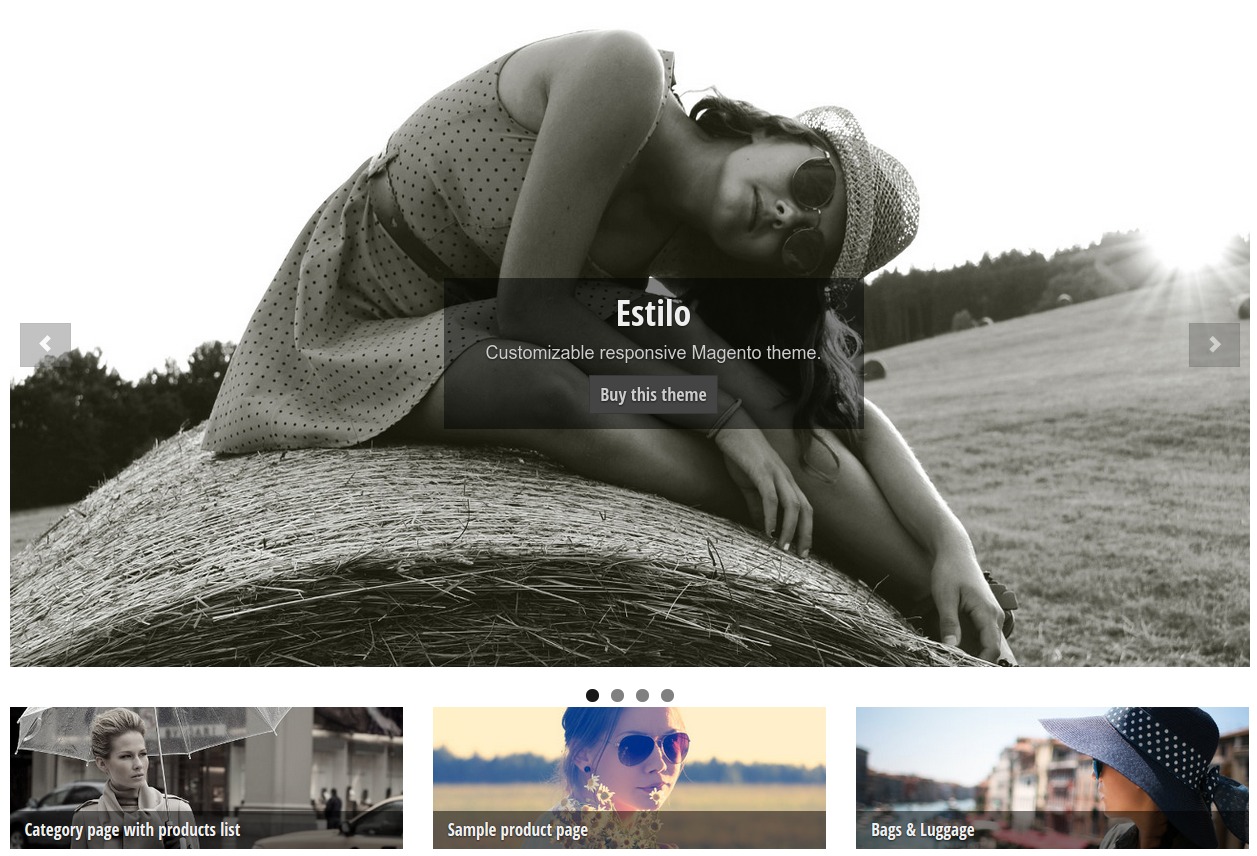
7. Homepage Blocks
The demo homepage contains a slideshow, a row of static blocks with links to custom pages and featured products. In this chapter, we will learn how to insert the slideshow and the 3 columns static block.
In order to create a homepage with the same elements as on the demo site, you need to insert the following code:
Homepage slideshow
You can configure the slideshow in System > Configuration > Mango Theme > Custom Blocks > Homepage Slideshow
To insert the homepage inside the main contents, using the "boxed" layout mode, the following code has to be used in the content of the CMS page:
{{block type="core/template" name="homepage_slider" as="homepage_slider" template="homepage/slider.phtml" slideshow_speed="5000" animation_speed="700" remove_container="true"}}For a full width slideshow, insert this in Design > Layout Update XML when editing the CMS page:
<reference name="root">
   <block type="core/template" name="homepage_slider" as="homepage_slider" template="homepage/slider.phtml">
      <action method="setSlideshowSpeed"><speed>6000</speed></action>
      <action method="setAnimationSpeed"><speed>1000</speed></action>
   </block>
</reference>
Static blocks
You can configure the 3 columns block in System > Configuration > Mango Theme > Custom Blocks > Homepage Static Blocks and then insert them in your homepage, after the slideshow or any other custom content, using this code:
{{block type="core/template" name="static_blocks" template="homepage/static_blocks.phtml"}}